Introduction
The Watchmen of the World were a genuinely dim comic book godlike social occasion as of in the no so distant past. That all unique with the 2014 film change that affected this ragtag bundle into superstardom. One of the most treasured characters from the gathering is the living tree Groot, despite the way that all he can figure out how to say is his name! Learn this tutorial and visit the latest drawing tutorial Dalmatian Drawing easy.
In the resulting film, we got to believe Groot to be a kid, and this would show to put him considerably more on the map. With such incalculable fans, a critical number of them like to sort out some way to draw in Youngster Groot to make their own expressive arts.
In case you genuinely love this charming tree, you’re impeccably situated! Our little by little aide on the most capable technique to draw in Kid Groot 7 phases will let you know the most effective way to imitate this individual.
Stage 1 – Youngster Groot Drawing
For the underlying step of our associate on the most capable strategy to draw Kid Groot, we will be starting with his head and face. Starting with the head outline, use a twisted line for the base part of his face. This will incite the top half, and that top of his head will be drawn for specific erratic squared shapes to give him a wooden look.
The lines for these shapes on top of his head will extend extremely far down into his face. Then, draw two really level, round shapes for his eyes and add some line nuances around them. You can finish with a little shape with teeth in it for his mouth, and a while later wandering 2 is on.
Stage 2 – Next, start drawing his arms
We will manage drawing in the start of his arms this second piece of your Youngster Groot drawing. Comparable as the most elevated mark of his head, we will use lots of unusual shapes communicating with one another for his arms and chest. They will in like manner have a lot of line specifying to frame this wooden effect furthermore. You can similarly add a thin plants generally through his body to take it significantly further. Then, you’ll be ready for stage 3
Stage 3 – Finish his arms in this step
As of now we can finish his arms in this step of our helper on the most capable strategy to draw Kid Groot. To do this, we will draw more sections for his arms as well as his hands at the terminations of them. These regions will be by and large pulled similarly that you wrapped up of his head and body, and the reference picture will guide you in how to arrange them.
Stage 4 – As of now, draw the rest of his body
You’re making unprecedented progress in this Kid Groot drawing up until this point! For this part, we will draw the rest of his body. His body will seem like it’s made of various more unobtrusive wooden “scales.” You can draw a couple of these more humble shapes interacting with one another, and in general they will approach the condition of his body. Make sure to leave a couple of spaces at the lower part of his body, as we will add his legs to those spaces soon.
Stage 5 – Draw the principal leg for Youngster Groot
This and the going with step of our assistant on the most capable technique to draw Youngster Groot will be based on finishing his legs. For the essential leg, we will draw it using nearly a more noteworthy measure of those “scale” shapes partner with one another in like manner to how you pulled in his body the last step.
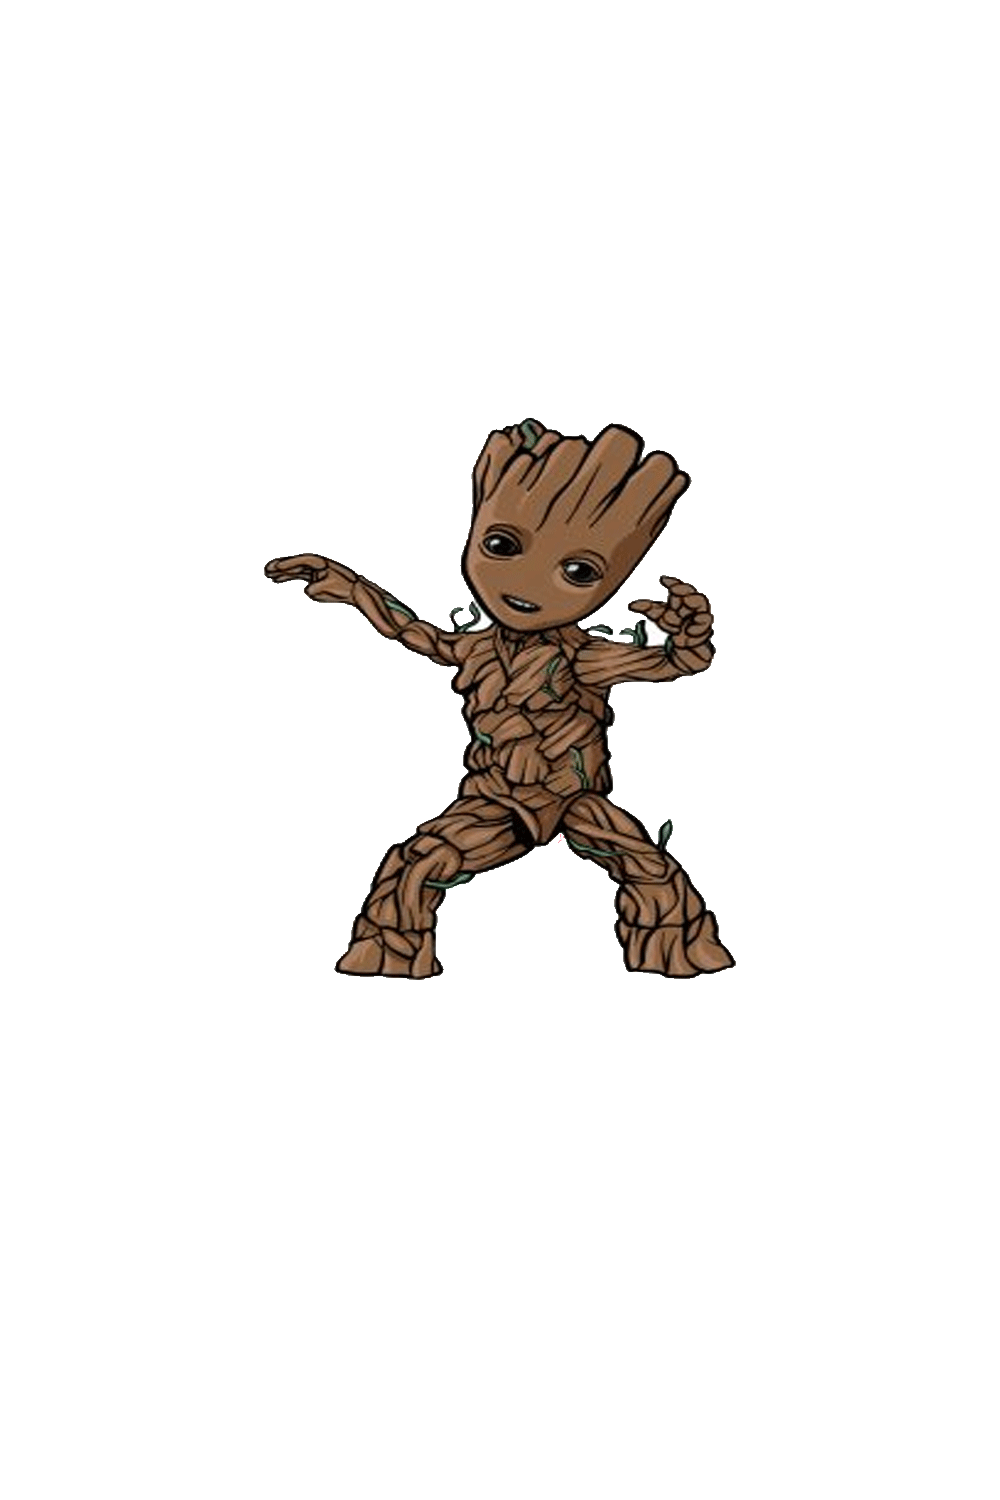
Kid Groot is a large part of the time seen moving, and we will address him doing a hit the dance floor with how we position his legs. As you can find in the reference picture, the leg on the left will be to some degree bowed. In the resulting stage, we will draw the accompanying leg close by a couple of last nuances.
Stage 6 – Finish your Youngster Groot drawing
As of now it is the best opportunity to finish the last nuances and parts of your Youngster Groot drawing in this step. In the first place, we will draw the second leg for him. This leg will look fundamentally equivalent to the one that you as of late drew, and it will in like manner be contorted outward so he seems like he’s moving. Then, your picture is done! You could similarly add a couple of silliness extra nuances of your own.
Groot is generally nearby his friend Rocket Raccoon, so maybe you could investigate certain photographs of that individual and draw him close by his wooden pal. What clowning around contacts and nuances might you anytime at some point consider to clean this off?
Stage 7 – Finish your Youngster Groot drawing with some tone
In this last step of our helper on the most capable technique to draw Kid Groot, we will clean him off with some tone. As you would imagine, we used a lot of brown to highlight his wooden appearance from the films and comics. We similarly added a few sprinkles of green all through the image for a piece of the little youngsters and plants found all over him.
These are the assortments that we picked, yet you could in like manner use a couple of one of a kind shades and assortments to suit your taste! Screwing with workmanship mediums is moreover an unprecedented technique for investigating various roads in regards to your ideal shades. There are more painterly mediums like acrylics and watercolors or others like concealed pens and pencils that you could test.